
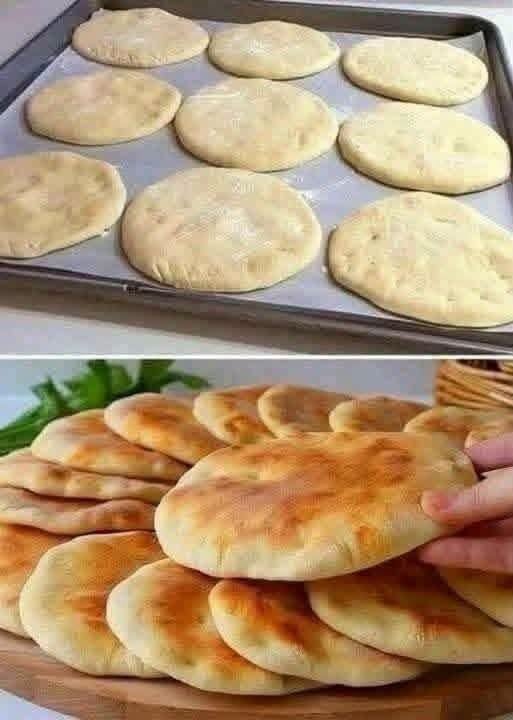
Soft Homemade Mini Pita Bread
Description
These Soft Homemade Mini Pita Breads are fluffy, tender, and lightly golden on the outside, with a deliciously soft texture inside. Made with simple pantry ingredients, this easy homemade bread is perfect for sandwiches, wraps, dipping into hummus, or serving alongside soups and Mediterranean meals. The dough is shaped into small rounds, allowed to rise until puffy, and baked until lightly golden. Whether you enjoy them fresh from the oven or save them for later, these homemade mini flatbreads are a wonderful addition to any family meal.
Ingredients
– 3 cups all-purpose flour
– 1 cup warm water
– 2¼ teaspoons active dry yeast (1 packet)
– 1 tablespoon sugar
– 1 teaspoon salt
– 2 tablespoons olive oil
– 2 tablespoons plain yogurt, optional, for extra softness
– Extra flour, for kneading and rolling
Instructions
Step 1: Activate the Yeast
Pour the warm water into a mixing bowl. Add the sugar and active dry yeast, then stir gently. Let the mixture stand for 5–10 minutes until foamy.
The water should be warm, not hot, because excessive heat can prevent the yeast from working.
Step 2: Prepare the Dough
Add the flour, salt, olive oil, and optional yogurt to the yeast mixture. Stir until a rough dough forms.
Transfer the dough to a lightly floured surface and knead for 8–10 minutes until smooth, elastic, and slightly soft. If the dough is too sticky, add flour a tablespoon at a time. Avoid adding too much flour, which can make the bread dry.
Step 3: Let the Dough Rise
Place the dough in a lightly oiled bowl and turn it once to coat. Cover with a clean kitchen towel or plastic wrap.
Leave it in a warm place for about 60–90 minutes, or until doubled in size.
Step 4: Divide and Shape
Gently press the dough to release excess air. Divide it into 10–12 equal pieces and roll each piece into a ball.
Cover the dough balls and let them rest for 10 minutes. Roll each one into a round approximately 4–5 inches wide and about ¼ inch thick.
Try to keep the thickness even so the breads bake consistently.
Step 5: Prepare the Baking Tray
Preheat the oven to 450°F (230°C). Place a sturdy baking tray inside while the oven heats.
Line another tray with parchment paper for arranging the rolled dough, if needed. Keep the shaped breads covered with a towel so they do not dry out while waiting to bake.
Step 6: Bake the Mini Pita Breads
Carefully place a few dough rounds on the hot baking tray, leaving space between them. Bake for approximately 4–7 minutes, depending on their thickness and your oven.
The breads should puff up and develop a few light golden spots. Avoid overbaking, as this can make them crisp instead of soft.
Repeat with the remaining rounds.
Step 7: Keep the Bread Soft
Transfer the baked pita breads to a clean kitchen towel and cover them immediately. Let them rest for a few minutes.
The trapped warmth helps soften the crust, giving the breads a tender texture similar to the ones shown in the picture.
Recipe Details
– Prep Time: 25 minutes
– Rising Time: 60–90 minutes
– Cook Time: 4–7 minutes per batch
– Total Time: Approximately 1 hour 35 minutes to 2 hours
– Servings: 10–12 mini pita breads
– Course: Bread, Side Dish
– Cuisine: Mediterranean and Middle Eastern inspired
– Cooking Method: Oven-baked
– Difficulty: Easy to moderate
Tips for Soft, Fluffy Pita Bread
– Use warm water: Water that is too hot can damage the yeast.
– Knead thoroughly: Proper kneading helps the dough become smooth and elastic.
– Allow enough rising time: The dough should visibly increase in size before shaping.
– Roll evenly: Uneven thickness may prevent the breads from puffing properly.
– Preheat the oven well: A hot oven helps the pita breads expand quickly.
– Cover after baking: Keeping the breads under a towel helps preserve their softness.
– Freeze for later: Once completely cool, freeze the breads in a sealed freezer bag for up to 2–3 months for best quality.
Frequently Asked Questions (Q&A)
Q1: Why didn’t my pita breads puff up?
The oven or baking tray may not have been hot enough, the dough may have been rolled unevenly, or the yeast may not have been active. Make sure the dough rises properly and the oven is fully preheated.
Q2: Can I make these mini pita breads without yogurt?
Yes. The yogurt is optional. You can omit it without changing the overall method.
Q3: Can I cook pita bread in a frying pan?
Yes. Heat a heavy skillet over medium-high heat. Cook each round for approximately 1–2 minutes per side, adjusting the heat as needed until puffed and lightly browned.
Q4: How do I keep pita bread soft?
Cover the breads with a clean towel immediately after baking and store them in an airtight bag once completely cool.
Q5: Can I prepare the dough ahead of time?
Yes. Place the covered dough in the refrigerator after kneading and allow it to rise slowly overnight. Bring it closer to room temperature before shaping.
Q6: How should I store homemade pita bread?
Keep it in an airtight bag at room temperature for about 2 days, or refrigerate for up to 4–5 days. Warm briefly before serving.
Q7: What can I serve with mini pita bread?
Serve it with hummus, falafel, grilled chicken, kebabs, salads, soups, or your favorite sandwich fillings.
Short Description
Soft Homemade Mini Pita Breads are fluffy, lightly golden flatbreads made with flour, yeast, warm water, and olive oil. Perfect for sandwiches, wraps, dips, and Mediterranean meals, these easy homemade breads are best enjoyed warm.