
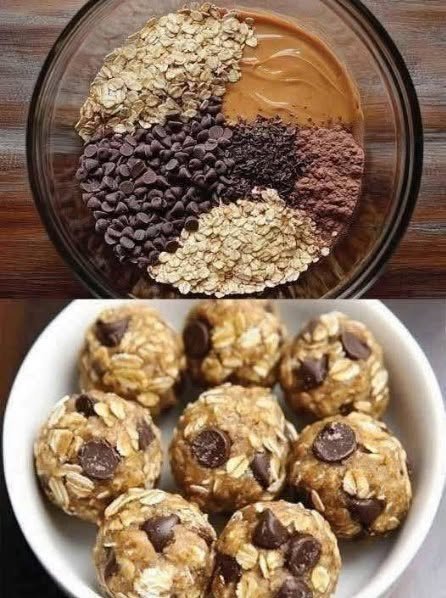
The first time I tried them at a get-together, I honestly thought they were some fancy homemade energy bites. They were chewy, nutty, slightly chocolatey, and just sweet enough. I asked for the recipe before I even finished the first one.
And now? I make them all the time.
They’re one of those recipes I usually throw together when I need a quick snack, but they’ve also become my secret weapon for parties. Put a plate of these out and watch how quickly they disappear. Someone inevitably asks, “Who made these?”
Honestly, they’re so good I probably shouldn’t admit how easy they are.
Why You’ll Love These Protein Balls
- No baking required
- Ready in about 10–15 minutes
- Made with simple pantry ingredients
- Naturally chewy and satisfying
- Easy to customize
- Great for breakfast, snacks, lunchboxes, or parties
- Easy to make ahead and keep in the refrigerator
Ingredients
Makes approximately 16 protein balls.
You’ll Need:
- 1 cup old-fashioned rolled oats
- ½ cup natural peanut butter
- ⅓ cup mini or regular chocolate chips
- ¼ cup honey or maple syrup
- 2 tablespoons ground flaxseed
- 1 tablespoon chia seeds
- 2 tablespoons unsweetened cocoa powder
- 1 teaspoon vanilla extract
- 2–4 tablespoons milk, as needed
- Pinch of salt
Optional Add-Ins
If you want to change things up, try:
- Shredded coconut
- Chopped almonds or walnuts
- Raisins or dried cranberries
- Cinnamon
- A little extra chocolate
- Your favorite protein powder
Tip: If you’re adding protein powder, you may need an extra splash of milk because it can make the mixture drier.
How to Make Protein Balls
Step 1: Combine the Dry Ingredients
Add the rolled oats, ground flaxseed, chia seeds, cocoa powder, and salt to a large mixing bowl.
Give everything a good stir so the cocoa is evenly distributed.
Step 2: Add the Peanut Butter and Honey
Add the peanut butter, honey, and vanilla extract.
I usually start mixing with a sturdy spoon, but honestly, once it gets thick, clean hands work just as well.
Mix until everything starts coming together into a sticky dough.
Step 3: Add the Chocolate Chips
Fold in the chocolate chips.
I like using mini chocolate chips because you get little bits of chocolate in almost every bite. If you only have regular-sized chips, just chop them up a little.
Step 4: Check the Consistency
This is the part where you have to trust the mixture rather than strictly follow the measurements.
If it feels too dry or crumbly, add 1 tablespoon of milk at a time until the mixture sticks together when pressed.
If it’s too wet, add another tablespoon or two of oats.
You want a texture that’s soft and sticky enough to roll but not so wet that it sticks all over your hands.
Step 5: Roll Into Balls
Scoop out roughly 1½ tablespoons of the mixture and roll it between your palms.
Repeat until you’ve used all the mixture.
I usually get around 16 protein balls, depending on how generous I’m feeling with each one.
Step 6: Chill
Place the protein balls on a plate or container and refrigerate for 30 minutes.
You can technically eat them right away, but I honestly think they’re better after chilling. They firm up and the flavors have a chance to come together.
My Best Tips for Perfect Protein Balls
Use creamy peanut butter
Creamy peanut butter makes these much easier to mix and roll. If your peanut butter is particularly thick, warm it for a few seconds first.
Don’t add all the milk at once
This is an easy mistake. Start with a tablespoon and add more only if needed.
Wet your hands slightly
If the mixture is sticking to your palms while rolling, lightly dampen your hands. It makes the process so much easier.
Chill the mixture if it’s too sticky
If you’re struggling to form the balls, pop the bowl in the refrigerator for about 15–20 minutes before rolling.
Taste before rolling
One of my favorite things about no-bake recipes is that you can taste the mixture! If you want it sweeter, add a little more honey. Want more chocolate? Throw in another handful of chocolate chips.
Don’t make them too big
Small-to-medium protein balls are easier to eat and are especially nice for parties. Plus, nobody feels guilty grabbing a second one.
Serving Suggestions
These homemade protein balls are incredibly versatile.
I usually serve them:
- Alongside coffee for a quick breakfast
- As an afternoon snack
- In lunchboxes
- Before or after a workout
- On a party snack table
- With fresh fruit and yogurt
- As a quick grab-and-go breakfast
For parties, I like putting them on a pretty platter with a few extra oats and chocolate chips sprinkled around the edges. They look much fancier than the amount of work that actually went into them.
How to Store Protein Balls
Store your protein balls in an airtight container in the refrigerator for up to 1 week.
You can also freeze them for longer storage. Place them in a freezer-safe container, separating layers with parchment paper if necessary.
When you want one, simply let it thaw in the refrigerator or at room temperature for a little while.
Approximate Nutrition Information
Nutrition will vary depending on the peanut butter, chocolate chips, protein powder, and other brands you use.
Per 1 protein ball, assuming 16 balls:
- Calories: ~135
- Protein: ~4 g
- Carbohydrates: ~14 g
- Fat: ~7 g
- Fiber: ~2 g
- Sugar: ~6 g
These numbers are estimates, not a substitute for nutrition information from specific product labels.
Frequently Asked Questions
1. Do protein balls need to be refrigerated?
I recommend refrigerating them because they hold their shape better and stay fresh longer. They can be eaten straight from the fridge or allowed to sit at room temperature for a few minutes.
2. Can I make protein balls without protein powder?
Absolutely! This recipe works perfectly well without protein powder. If you want to increase the protein, you can add your favorite protein powder and adjust the milk as needed.
3. Why are my protein balls falling apart?
Usually, the mixture is simply too dry. Add a small amount of milk or a little extra peanut butter and mix again. Avoid adding too much liquid at once.
4. Can I use almond butter instead of peanut butter?
Yes! Almond butter, cashew butter, or another nut or seed butter can work. The consistency can vary between brands, so adjust the oats or milk as needed.
5. Can I freeze homemade protein balls?
Yes. They’re great for freezing. Keep them in an airtight freezer-safe container and thaw individual portions whenever you need a quick snack.
Final Thoughts
These easy no-bake protein balls have officially become one of those recipes I make without even thinking about it.
They’re quick, they’re delicious, and there’s no oven, complicated equipment, or long ingredient list involved. The combination of peanut butter, oats, cocoa, chocolate chips, and a touch of honey is just ridiculously good.