
Introduction
I don’t buy bread nearly as often anymore, and honestly, this recipe is a big reason why.
There’s something so satisfying about making a batch of warm homemade bread with ingredients I almost always have in the pantry. No fancy equipment, no complicated techniques, and—best of all—no kneading, no eggs, and no butter.
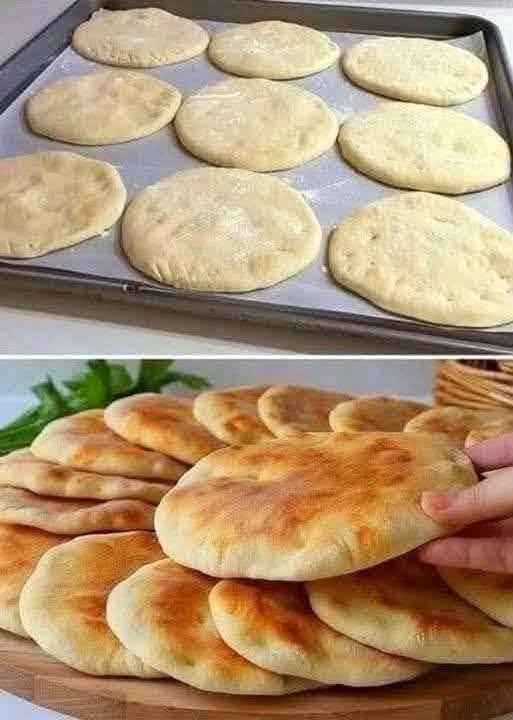
I usually make these little round breads when I want something warm to serve with soup, eggs, cheese, or a simple dinner. They’re soft inside with a lightly golden outside, and they’re especially good when eaten straight from the oven.
The first time I made them, I wasn’t expecting much because the dough looked almost too simple. But once they came out golden and puffed, I was sold. Now I understand why simple bread recipes like this one get passed around so much.
And if you’re watching your grocery budget, this is a real little treasure. Flour, yeast, water, salt, and a few basic ingredients are all you need.
Ingredients
For the No-Knead Bread
- 4 cups (500 g) all-purpose flour
- 1½ cups (360 ml) warm water
- 2¼ teaspoons (7 g) active dry yeast
- 1 tablespoon sugar
- 1 teaspoon salt
- 2 tablespoons vegetable oil or olive oil
- Extra flour, for shaping
- A little oil for greasing the baking tray
Optional Toppings
You can keep these completely plain, or add:
- Sesame seeds
- Black sesame seeds
- Dried herbs
- Garlic powder
- Flaky salt
- A sprinkle of shredded cheese
How to Make Easy No-Knead Bread
1. Activate the yeast
Pour the warm water into a large mixing bowl.
Add the sugar and yeast and give it a gentle stir. Let it sit for about 5–10 minutes.
You should see a little foam forming on the surface. That’s a good sign that your yeast is active.
Don’t use very hot water. It should feel comfortably warm, not hot to the touch, because excessively hot water can damage the yeast.
2. Make the dough
Add the flour and salt to the bowl. Pour in the oil.
Using a wooden spoon, spatula, or your hands, mix everything together until you have a rough, sticky dough.
And this is where the recipe gets wonderfully easy: don’t knead it!
The dough doesn’t need to look smooth. As long as there are no large pockets of dry flour, you’re good to go.
3. Let the dough rise
Cover the bowl with plastic wrap, a clean kitchen towel, or a plate.
Place it somewhere warm and let the dough rise for approximately 1–1½ hours, or until it has noticeably increased in size.
I usually just leave mine on the kitchen counter and get on with whatever else I’m doing.
If your kitchen is cool, the dough may need a little longer.
4. Divide the dough
Once the dough has risen, lightly flour your work surface.
Turn the dough out and divide it into approximately 8–10 equal pieces.
You don’t need to work the dough much. Just gently shape each piece into a ball.
If the dough is very sticky, lightly flour your hands rather than adding lots of flour to the dough.
5. Shape the breads
Take one dough ball and gently flatten it with your fingers or roll it out lightly.
Aim for a round piece about ½ inch thick. It doesn’t have to be perfectly round—rustic-looking bread is part of the charm!
Repeat with the remaining pieces.
Place the shaped breads on a lightly greased or parchment-lined baking tray, leaving a little space between them.
6. Give them a short second rise
Cover the tray loosely and let the breads rest for another 15–20 minutes.
This short rest helps give them a lighter, softer texture.
Meanwhile, preheat your oven to 425°F (220°C).
7. Bake until golden
Place the tray in the preheated oven and bake for approximately 12–18 minutes, depending on the size and thickness of your breads.
They’re ready when they’re lightly puffed and beautifully golden on top.
If you want a little more color, you can switch to the broiler for the final minute or two—but keep a close eye on them because they can brown quickly.
8. Cool and enjoy
Let the breads cool for a few minutes before serving.
I know it’s tempting to tear one open immediately, and honestly, I usually do. There’s nothing quite like that first bite of warm homemade bread.
Cooking Tips for Perfect No-Knead Bread
Use fresh yeast
If your yeast has been sitting in the cupboard for ages, check the expiration date. If it doesn’t foam when mixed with warm water, it’s better to start over with fresh yeast.
Don’t add too much flour
This is probably the most important tip.
The dough should be soft and somewhat sticky. Adding too much flour can make the finished bread dense and dry.
Use just enough flour to make the dough manageable.
Let the dough rise properly
Don’t rush the first rise. The dough should become noticeably larger and airy.
The exact rising time depends on the temperature of your kitchen, so look at the dough rather than the clock.
Don’t overbake
For soft bread, you don’t want to leave these in the oven until they’re dark brown. Once they’re lightly golden and cooked through, take them out.
Want extra-soft bread?
As soon as the breads come out of the oven, lightly brush the tops with a tiny amount of olive oil and cover them with a clean kitchen towel for several minutes.
This helps keep the crust pleasantly soft.
Can I Cook This Bread Without an Oven?
Yes!
I sometimes use a heavy skillet when I don’t want to turn on the oven.
Heat a lightly oiled skillet over medium-low heat. Place a flattened piece of dough in the pan and cook for approximately 3–5 minutes per side, adjusting the heat as needed.
The bread should puff slightly and develop golden-brown spots.
Keep the heat moderate. If the outside browns too quickly while the middle remains doughy, lower the heat.
Serving Suggestions
These homemade breads are incredibly versatile.
I usually serve them warm with:
- Butter or olive oil
- Honey or jam
- Scrambled or fried eggs
- Cheese
- Hummus
- Soup or stew
- Roasted vegetables
- Grilled chicken
- Beans or lentils
- Garlic and herbs
They’re also fantastic for making simple sandwiches or using as a soft wrap.
For breakfast, try one with honey and a cup of coffee. For dinner, tear it into pieces and use it to scoop up soup or a flavorful sauce.
How to Store Homemade Bread
Let the bread cool completely before storing it.
Place it in an airtight container or reusable bread bag and keep it at room temperature for about 2–3 days.
For longer storage, freeze the cooled breads individually. Once frozen, they can be reheated in the oven, toaster oven, or skillet.
I actually like freezing a few because it’s so convenient to pull one out whenever I need a quick piece of homemade bread.
Approximate Nutrition Information
Per serving, assuming 10 breads and using vegetable oil; nutrition will vary depending on the exact ingredients and portion size.
- Calories: 210–230 kcal
- Carbohydrates: 38–42 g
- Protein: 5–6 g
- Fat: 4–5 g
- Fiber: 1–2 g
- Sugar: 1–2 g
- Sodium: 230–260 mg
Frequently Asked Questions
1. Can I really make this bread without kneading?
Yes! That’s the beauty of this recipe. The long resting and rising time allows the dough to develop structure without traditional kneading.
Just mix the ingredients thoroughly, cover the dough, and let time do most of the work.
2. Can I make this recipe without eggs and butter?
Absolutely. This recipe contains no eggs and no butter. Oil provides a little tenderness while the yeast and rising process give the bread its soft, airy texture.
3. Why is my dough sticky?
A slightly sticky dough is completely normal. The amount of flour needed can vary depending on humidity and how the flour is measured.
Instead of adding a lot more flour, lightly flour your hands and work surface when shaping the dough.
4. Can I use whole wheat flour?
Yes, although the bread will be denser and have a more substantial texture. For a softer result, I usually recommend replacing only 25–50% of the all-purpose flour with whole wheat flour.
You may also need a little additional water.
5. Can I prepare the dough the night before?
Yes. For a longer, slower rise, cover the dough tightly and refrigerate it overnight.
The next day, let it sit at room temperature for a while before shaping so the dough can warm up and become easier to handle. This can also give the bread a deeper flavor.
Conclusion
If you’ve been intimidated by homemade bread, start with this recipe.
There’s no kneading until your arms hurt, no eggs to crack, and no butter required. Just mix the dough, let it rise, shape it, and bake.
I usually make a batch when I realize we’re out of bread, but honestly, I’ve started making it even when we do have bread in the kitchen. Warm, homemade bread is just hard to beat.