
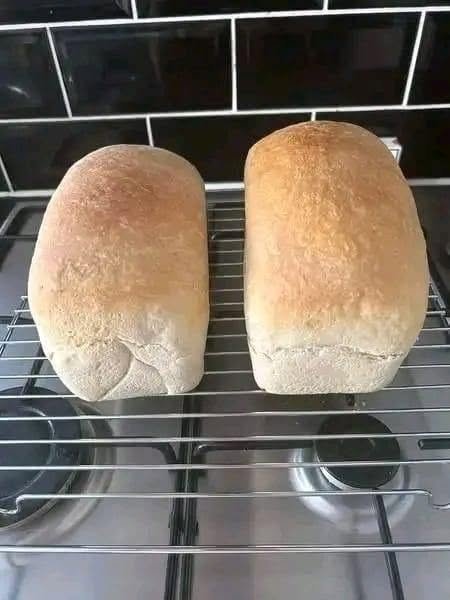
I used to think homemade bread meant kneading dough for ages, getting flour everywhere, and hoping I hadn’t somehow ruined it. Honestly, that’s exactly why I didn’t make it very often.
Then I started making no-knead bread.
This recipe completely changed my mind. There’s no kneading, no eggs, and no butter, and you only need a handful of inexpensive ingredients. I usually mix everything together in a bowl, cover it, let time do most of the work, and then bake it until the crust turns beautifully golden.
The result is a soft, fluffy loaf with a lightly crisp crust—the kind of everyday bread that works for breakfast, sandwiches, toast, or simply tearing off a warm piece and eating it with a little jam.
And the best part? You don’t need a fancy bread machine or stand mixer.
Ingredients
Makes 2 medium loaves
-
6 cups (750 g) all-purpose or bread flour
-
2 1/4 cups (540 ml) warm water
-
2 1/4 teaspoons (7 g) instant or active dry yeast
-
1 tablespoon sugar
-
1 1/2 teaspoons salt
-
2 tablespoons vegetable oil or olive oil
-
Extra flour, for shaping
A note about the water
The water should feel warm, not hot. Very hot water can damage the yeast and prevent the dough from rising properly.
How to Make No-Knead Bread
1. Mix the yeast and water
Pour the warm water into a large mixing bowl.
Add the sugar and yeast and stir gently. If you’re using active dry yeast, let it sit for about 5–10 minutes, until it becomes slightly foamy.
If you’re using instant yeast, you can mix it directly with the flour instead.
2. Add the flour and salt
Add the flour and salt to the bowl.
Pour in the oil and mix everything together with a wooden spoon, spatula, or your hands.
You don’t need to knead the dough. Just mix until there are no large patches of dry flour.
The dough should be soft, sticky, and somewhat shaggy. Don’t worry if it doesn’t look smooth at this point.
That’s exactly what we want.
3. Cover and let it rise
Cover the bowl tightly with plastic wrap, a lid, or a clean kitchen towel.
Leave it somewhere warm and draft-free for approximately 1–2 hours, or until the dough has noticeably increased in size.
I usually don’t obsess over the exact time. If my kitchen is warm, it rises faster; if it’s cool, I simply give it more time.
The dough should look puffy and airy.
4. Divide the dough
Lightly flour your work surface.
Turn the dough out of the bowl and divide it into two roughly equal portions.
There’s no need to aggressively punch the dough down. Handle it gently so you don’t knock out all those lovely air bubbles.
5. Shape the loaves
Take one portion and gently shape it into a loaf.
You can make a simple oval or rectangular loaf depending on the pan you’re using.
Place each loaf into a lightly greased loaf pan, or place them on a parchment-lined baking sheet if you prefer free-form loaves.
6. Let them rise again
Cover the shaped loaves loosely and let them rest for another 30–45 minutes.
They should become visibly puffier.
Meanwhile, preheat your oven to 400°F (200°C).
7. Bake
Place the loaves in the preheated oven.
Bake for approximately 30–40 minutes, depending on the size and shape of your loaves.
The tops should be golden brown, and the bread should sound hollow when you gently tap the bottom.
If the tops are browning too quickly, loosely cover them with aluminum foil during the final part of baking.
8. Cool before slicing
This is probably the hardest part!
I know it’s tempting to slice the bread immediately when it comes out of the oven, but try to wait at least 30–45 minutes.
The inside continues to set as the loaf cools. Cutting too early can give you a gummy or compressed crumb.
Once cooled, slice and enjoy.
Why This Bread Doesn’t Need Kneading
Traditional bread recipes often rely on kneading to develop gluten.
With this recipe, time does much of that work for you.
The flour, water, and yeast sit together long enough for the dough structure to develop naturally. That’s why you can mix the dough, walk away, and let the resting period do the heavy lifting.
Honestly, that’s my favorite thing about this recipe.
My Best Tips for Perfect Homemade Bread
Don’t add too much flour
This is probably the most common mistake.
Because the dough is sticky, you may feel tempted to keep adding flour. Try not to.
A slightly sticky dough generally produces a softer loaf. Too much flour can make homemade bread dense and dry.
Give the dough enough time
Bread dough doesn’t always follow the clock.
If your kitchen is cold, the first rise may take longer. Look at the dough rather than relying entirely on the timer—it should become noticeably larger and puffy.
Use fresh yeast
If your yeast is old or inactive, the bread may barely rise.
If you’re unsure about your yeast, test active dry yeast in warm water with a little sugar before starting.
Don’t use very hot water
Warm water is what you want. Hot water can prevent the yeast from working properly.
Don’t skip the second rise
The second rise helps create a lighter, softer loaf.
Even a short 30-minute rest after shaping can make a noticeable difference.
Let the bread cool
I know. It’s difficult.
But allowing the bread to cool before cutting gives you a much better texture.
Can I Make This Bread Without Oil?
Yes.
The oil isn’t essential for making the dough rise, but it helps give the bread a softer texture and keeps it from drying out as quickly.
If you want a completely oil-free loaf, simply leave it out.
Can I Use Whole-Wheat Flour?
You can replace some of the white flour with whole-wheat flour.
I usually recommend starting with 25–30% whole-wheat flour rather than replacing all of it. Whole-wheat flour absorbs more water and can produce a heavier loaf.
If you use a larger proportion of whole-wheat flour, you may need to adjust the water slightly.
Serving Suggestions
Fresh homemade bread is incredibly versatile.
I love serving it warm with:
-
Butter or olive oil
-
Jam or honey
-
Peanut butter
-
Cream cheese
-
Scrambled eggs
-
Cheese and tomatoes
-
Soup or stew
-
Grilled chicken
-
Hummus
-
Avocado and a sprinkle of salt
For breakfast, toast a slice and add jam.
For lunch, use it for sandwiches.
And honestly, sometimes the simplest option is the best: a warm slice straight from the loaf with whatever spread you have in the refrigerator.
How to Store Homemade Bread
Once completely cool, store the bread in an airtight bag or bread container at room temperature.
It should stay pleasantly soft for a couple of days.
For longer storage, slice the loaves and freeze them in a freezer-safe bag. You can take out individual slices whenever you need them and toast them directly from frozen.
I actually prefer freezing extra homemade bread rather than letting a whole loaf sit around until it becomes stale.
Approximate Nutrition
Per serving, assuming 16 slices total from the two loaves:
-
Calories: ~190–210
-
Carbohydrates: ~35–38 g
-
Protein: ~5–6 g
-
Fat: ~2–3 g
-
Fiber: ~1–2 g
-
Sugar: ~1–2 g
-
Sodium: ~220–250 mg
These numbers are approximate and will vary depending on the flour, oil, slice size, and exact ingredients used.
Frequently Asked Questions
1. Can I really make bread without kneading?
Yes. That’s the beauty of this recipe. Instead of kneading the dough extensively, you mix it thoroughly and allow the resting and rising time to help develop its structure.
2. Why is my no-knead bread dense?
The most common reasons are inactive yeast, insufficient rising time, or adding too much flour. Make sure the yeast is fresh and give the dough enough time to become noticeably puffy before baking.
3. Can I make this recipe without eggs and butter?
Absolutely. Neither eggs nor butter is required. The basic dough relies on flour, water, yeast, salt, and a small amount of sugar, with oil used here for a softer texture.
4. Can I prepare the dough the night before?
Yes. For a longer, slower rise, cover the mixed dough and refrigerate it overnight. The next day, allow it to warm up somewhat before shaping, then give the shaped loaves time to rise before baking.
5. How do I know when the bread is fully baked?
The loaf should be nicely golden and sound hollow when tapped underneath. If you have a kitchen thermometer, the center of a lean yeast bread is generally around 190–200°F (88–93°C) when fully baked.
Final Thoughts
I honestly think this is one of those recipes everyone should have in their back pocket.
There’s no kneading, no eggs, no butter, no expensive ingredients, and no special equipment. Just mix the dough, give it time, shape it, and bake.
I usually make two loaves at once because homemade bread disappears surprisingly quickly in my house. One loaf can go on the breakfast table, while the other can be sliced and frozen for later.