
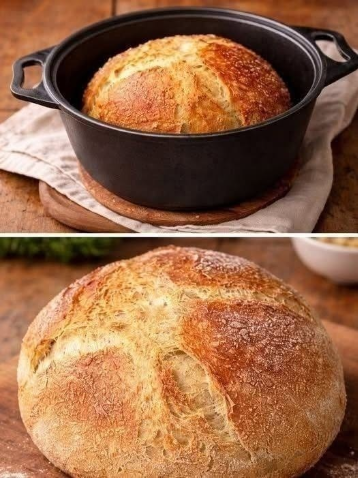
Learn how to make easy Dutch oven bread with a crisp golden crust and soft, chewy center. This simple no-knead bread recipe uses basic ingredients and requires very little hands-on work.
Easy Dutch Oven Bread Recipe
There’s something incredibly satisfying about pulling a loaf of homemade bread out of the oven, especially when it has that deep golden crust and crackly top you usually associate with a bakery.
I started making this Dutch oven bread because, honestly, I wanted homemade bread without turning my kitchen into a flour-covered science lab. This recipe is wonderfully simple. You mix the dough, let time do most of the work, shape it, and bake it in a hot Dutch oven.
The Dutch oven traps steam around the dough while it bakes, which helps create that beautiful crisp crust while keeping the inside soft and chewy. I usually let the loaf cool before slicing, although I’ll admit that waiting is probably the hardest part of the whole recipe!
Ingredients
You only need a handful of basic ingredients to make this easy homemade bread.
- 3 cups (360 g) all-purpose flour or bread flour
- 1½ cups (360 ml) lukewarm water
- 1½ tsp salt
- 1 tsp instant yeast
- 1 tsp sugar or honey, optional
- 1 tbsp olive oil, optional
- Extra flour or cornmeal for shaping
Equipment
- 4–6 quart Dutch oven with a lid
- Large mixing bowl
- Wooden spoon or spatula
- Parchment paper
- Clean kitchen towel
How to Make Dutch Oven Bread
1. Mix the dough
Add the flour, yeast, salt, and sugar to a large bowl. Stir everything together.
Pour in the lukewarm water and mix with a wooden spoon until you have a shaggy, sticky dough. If you’re using olive oil, add it along with the water.
Don’t worry if the dough looks messy at this stage. That’s exactly what we’re looking for.
I usually resist the temptation to add lots of extra flour. A wetter dough is one of the things that helps give this bread its lovely open, chewy texture.
2. Let the dough rise
Cover the bowl tightly with plastic wrap or a clean kitchen towel.
Leave the dough at room temperature for approximately 8–12 hours, or until it has noticeably expanded and looks bubbly on the surface.
Overnight is perfect. I usually mix everything before bed and let it rise while I sleep.
If your kitchen is particularly cold, it may take a little longer.
3. Shape the loaf
Lightly flour your work surface.
Tip the dough out of the bowl and gently fold it over itself a few times. You don’t need to knead it like traditional bread dough.
Shape it into a rough round loaf by gently pulling the edges underneath to create a smooth surface.
Place the dough on a sheet of parchment paper and cover it with a towel. Let it rest for about 30–60 minutes.
4. Preheat the Dutch oven
Place your Dutch oven and its lid inside the oven.
Preheat everything to 450°F (230°C) for about 30–45 minutes.
This is an important step. A properly heated Dutch oven gives the dough an immediate burst of heat when it goes inside.
Be extremely careful when handling the Dutch oven—it will be very hot.
5. Score the dough
Just before baking, carefully make one or two shallow cuts across the top of the dough using a sharp knife or bread lame.
This gives the steam somewhere to escape and also creates that classic artisan-bread appearance.
You can keep it simple with one slash, or make a decorative pattern if you’re feeling ambitious.
6. Bake the bread
Carefully remove the hot Dutch oven from the oven.
Using the parchment paper as a sling, lower the dough into the Dutch oven.
Cover with the lid and bake for 30 minutes.
The covered portion of the bake allows steam to build up, which is the secret to that gorgeous crust.
7. Finish uncovered
Remove the lid and continue baking for another 10–20 minutes, or until the bread is a deep golden brown.
I usually go for a fairly dark golden crust because those darker edges have so much flavor.
If your loaf is browning too quickly, reduce the oven temperature slightly.
8. Let it cool
Remove the bread from the Dutch oven and place it on a wire rack.
Let it cool for at least 1 hour before slicing.
I know. Waiting an entire hour when your kitchen smells like freshly baked bread feels slightly cruel.
But cutting into the loaf too soon can make the inside gummy, so it’s worth being patient.
Cooking Tips for Perfect Dutch Oven Bread
Don’t panic about sticky dough
This dough should be somewhat sticky. If you add too much flour, the finished bread can become dense and heavy.
Give it enough rising time
The long fermentation is what helps develop flavor and texture. Look at the dough rather than relying only on the clock—it should look puffy and noticeably expanded.
Use a very hot Dutch oven
Preheating the Dutch oven is one of the most important tricks for getting a crisp crust and good oven spring.
Don’t skip the lid
The covered baking stage traps steam inside the pot. That steam helps the crust stay flexible while the bread expands.
Let the bread cool
As tempting as it is to slice immediately, cooling allows the interior to finish setting.
Use bread flour for a chewier loaf
All-purpose flour works beautifully, but bread flour can give the loaf a slightly chewier texture and stronger structure.
Add flavor if you like
You can mix in dried herbs, roasted garlic, shredded cheese, olives, or seeds for a completely different loaf.
Serving Suggestions
This homemade Dutch oven bread is incredibly versatile.
With butter
Honestly, sometimes a thick slice of warm bread with butter is all I need.
For sandwiches
Slice the cooled loaf and use it for grilled cheese, chicken sandwiches, egg sandwiches, or deli-style lunches.
With soup
Serve thick slices alongside tomato soup, lentil soup, chicken soup, or creamy vegetable soup. The crust is especially good for soaking up broth.
With breakfast
Toast a slice and top it with:
- Scrambled eggs
- Avocado
- Fried eggs
- Peanut butter and honey
- Jam or fruit preserves
As an appetizer
Cut the bread into chunks and serve with olive oil, balsamic vinegar, cheese, and olives.
Make homemade croutons
If you somehow have leftovers, cube the bread, toss it with olive oil and seasonings, and bake until crisp. Homemade croutons are so much better than I expected.
Nutrition Information
Approximate nutrition per serving, assuming the loaf is divided into 10 slices:
- Calories: 170 kcal
- Carbohydrates: 34 g
- Protein: 5 g
- Fat: 1 g
- Saturated Fat: 0.2 g
- Fiber: 1 g
- Sugar: 0.5 g
- Sodium: 350 mg
Nutrition is an estimate and will vary depending on the flour, serving size, and optional ingredients used.
Frequently Asked Questions
1. Can I make Dutch oven bread without kneading?
Yes! That’s one of the best things about this recipe. The long resting time allows the gluten to develop naturally, so you don’t need to spend 10–15 minutes kneading the dough.
2. Can I use all-purpose flour?
Absolutely. All-purpose flour works very well for this recipe. Bread flour can give you a slightly chewier loaf, but you don’t need anything fancy to get good results.
3. What if I don’t have a Dutch oven?
A Dutch oven is ideal because it traps steam, but you can use another heavy oven-safe pot with a tight-fitting lid. Make sure the entire pot and lid are rated for the baking temperature.
4. Why didn’t my bread rise very much?
There are a few possibilities. Your yeast may be old, the room may be too cold, or the dough simply needs more time. Yeast works more slowly in cooler temperatures, so don’t be afraid to extend the rising time.
5. How should I store homemade bread?
Once completely cool, store the bread at room temperature in a paper bag or loosely wrapped in a clean kitchen towel. Avoid refrigerating it if possible, as refrigeration can make bread go stale faster. For longer storage, slice the loaf and freeze it in an airtight freezer bag.
Final Thoughts
If you’ve always thought homemade artisan bread was complicated, this easy Dutch oven bread recipe is a great place to start.
There’s no complicated kneading technique and no special bread-making equipment required beyond a Dutch oven. Most of the work is simply waiting while the dough rises.
I usually make this loaf when I know I’ll have a lazy morning or when we’re having soup for dinner. The smell alone makes the house feel warmer, and that crisp crust with a soft, chewy center is hard to beat.
Mix it, let it rise, bake it, and enjoy. That’s honestly about as easy as homemade bread gets.