
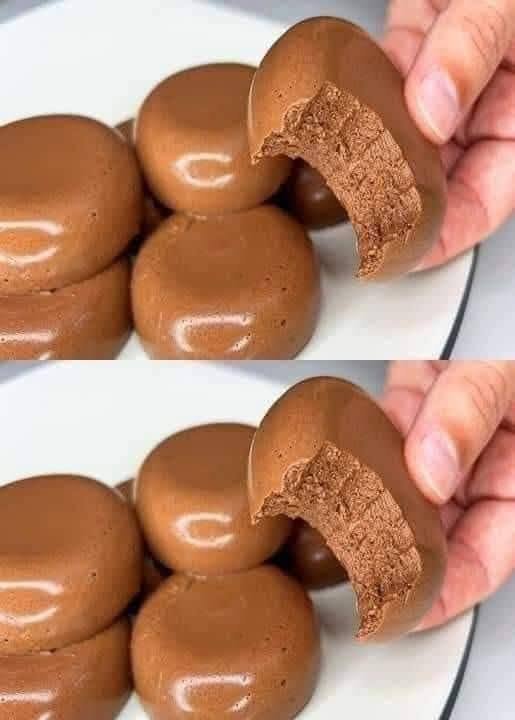
I had been trying to come up with a chocolate dessert that didn’t require a pile of sugar, butter, or flour. You know the kind of recipe where you can satisfy that chocolate craving without feeling like you need to make a full-blown cake?
This was my answer.
The first time I made these little chocolate treats, I wasn’t expecting much. I blended the ingredients together, baked them, and crossed my fingers. But when they came out looking all smooth and chocolatey, I knew we were onto something.
The texture is what surprised me most. They’re soft, rich, and almost mousse-like in the middle, with plenty of chocolate flavor. And because there are only three ingredients, cleanup is ridiculously easy.
I usually make a batch when we’re craving something sweet but I don’t want to spend an hour in the kitchen.
And yes, my husband immediately asked if there were any more.
Why You’ll Love This 3-Ingredient Chocolate Dessert
- Only 3 simple ingredients
- No added granulated sugar
- No flour
- No butter or oil
- Easy to prepare in a blender
- Rich chocolate flavor
- Naturally sweetened
- Great for portion-controlled treats
- Perfect when a chocolate craving hits
Ingredients
You only need three ingredients:
1. Ripe Bananas
Use 2 very ripe medium bananas.
The riper they are, the sweeter your dessert will be. I usually wait until the bananas have plenty of brown spots because they’re softer, sweeter, and much easier to blend.
2. Eggs
You’ll need 2 large eggs.
The eggs help give these chocolate bites their soft, custard-like texture while also helping everything set during baking.
3. Unsweetened Cocoa Powder
Use 1/3 cup unsweetened cocoa powder.
Regular unsweetened cocoa powder works perfectly here. Don’t use hot cocoa mix because it contains added sugar and other ingredients.
How to Make This Easy Chocolate Dessert
Step 1: Prepare Your Oven
Preheat your oven to 350°F (175°C).
Lightly grease a silicone mold or several small oven-safe ramekins.
If you’re using a silicone mold, place it on a baking sheet before filling it. That makes it much easier to move in and out of the oven.
Step 2: Blend the Ingredients
Peel the bananas and place them in a blender.
Add the eggs and unsweetened cocoa powder.
Blend everything until completely smooth.
I usually let the blender run for another 20–30 seconds after it looks smooth. You want the batter to be creamy with no obvious banana pieces remaining.
The mixture will look quite thin at this stage. That’s completely normal.
Step 3: Fill the Molds
Pour the chocolate mixture into your prepared molds or ramekins.
Don’t fill them all the way to the top. Leave a little room because they’ll puff slightly as they cook.
For individual portions, small ramekins work beautifully.
Step 4: Bake
Bake for approximately 15–20 minutes, depending on the size of your molds.
The outside should look set while the center can still have a very slight jiggle.
Try not to overbake them. That’s the easiest way to lose that soft, almost creamy texture.
Step 5: Cool
Remove the desserts from the oven and let them cool for several minutes.
They’ll continue to firm up as they cool.
For the texture shown in the photo, let them cool completely and then refrigerate them for a couple of hours. The chilled version is firmer, smoother, and especially good straight from the refrigerator.
Cooking Tips for the Best Results
Use very ripe bananas
This is probably my biggest tip.
Since we’re not adding sugar, the bananas provide the sweetness. Green or barely ripe bananas simply won’t give you the same result.
Use good cocoa powder
Chocolate is one of the main flavors here, so the cocoa powder matters. A good-quality unsweetened cocoa will give you a much deeper chocolate flavor.
Don’t overbake
These aren’t supposed to have the texture of a dry chocolate cake.
I usually take them out when the edges are set but the middle still looks just slightly soft. They’ll firm as they cool.
Chill them
You can eat them warm, but honestly, I prefer them chilled.
After a couple of hours in the refrigerator, the texture becomes wonderfully dense and creamy.
Want a sweeter dessert?
The sweetness depends heavily on the bananas. If you have a serious sweet tooth, you can add a calorie-free sweetener, but that would technically make it more than three ingredients.
For the strict three-ingredient version, use the ripest bananas you can find.
Serving Suggestions
These little chocolate desserts are delicious on their own, but you can make them feel a little more special without much effort.
Try serving them with:
- Fresh strawberries or raspberries
- A few banana slices
- Plain Greek yogurt
- A dusting of unsweetened cocoa powder
- Fresh mint
- A small spoonful of whipped cream
- A few shaved pieces of dark chocolate
If I’m serving these after dinner, I usually add a couple of fresh berries on the side. It makes the plate look pretty without turning the dessert into something complicated.
How to Store Them
Once completely cooled, place the chocolate desserts in an airtight container and refrigerate.
They should keep well for approximately 3 days.
They’re actually a great make-ahead dessert because the texture becomes firmer after chilling.
I wouldn’t leave them sitting at room temperature for hours because they’re made with eggs.
Approximate Nutrition Information
Nutrition will vary depending on the size of your bananas and the exact ingredients used.
Assuming the recipe makes 6 individual servings, each serving is approximately:
- Calories: 85–95
- Protein: 4g
- Carbohydrates: 13g
- Fat: 3g
- Fiber: 2g
- Sugar: 6–7g
- Sodium: 35–45mg
The sugar listed here is naturally occurring sugar from the bananas, not added granulated sugar.
Frequently Asked Questions
1. Is this chocolate dessert really made with only three ingredients?
Yes! The basic recipe uses only ripe bananas, eggs, and unsweetened cocoa powder. That’s it.
It’s one of those recipes I keep coming back to because I almost always have all three ingredients in the kitchen.
2. Can I use less ripe bananas?
You can, but I wouldn’t recommend it.
Because there is no added sugar, the bananas are responsible for most of the sweetness. Very ripe bananas produce a noticeably sweeter and more flavorful dessert.
3. Can I make these without a blender?
Absolutely. Mash the bananas extremely well, then whisk in the eggs and cocoa powder until smooth.
A blender simply makes the mixture extra silky and helps eliminate banana lumps.
4. Can I make this dessert ahead of time?
Yes. These are actually excellent when made ahead.
Bake them, let them cool, then refrigerate them in a covered container. I think they taste even better after they’ve had time to chill.
5. Are these low calorie?
They’re relatively low in calories compared with many traditional chocolate cakes and puddings, but the exact calorie count depends on the size of your bananas and the number of portions you make.
They’re best thought of as a simple, portion-controlled chocolate treat, rather than a “diet food.”
Final Thoughts
Sometimes the recipes that become permanent favorites are the ones that look almost too simple to work.
Three ingredients. One bowl—or blender. No added sugar. No complicated steps.
And yet, somehow, you end up with a rich little chocolate dessert that makes everyone stop talking long enough to take another bite.
My husband certainly didn’t believe these could be made without sugar until he tried them. His reaction pretty much said it all.
So if you have a couple of ripe bananas sitting on the counter, don’t throw them away.